Showing posts with label diy. Show all posts

fabric window diy

No Comments »

Here is part of my kitchen. There is a little window with some neat glass in it. What is outside of the window? A staircase. A loud, echoey staircase that myself and two other neighbors use. They can't really see me through it, but I still feel like I don't have much privacy in my kitchen, you know? So I thought I would work at covering it up.

Here you can see this window in relation to part of my kitchen. (And no, it's not my choice to have those farm decals be up on the wall! I just can't reach them to take them down.)
Here is what you need:

  1. Fabric of your choice
  2. Cardboard
  3. Fabric glue
  4. Fabric scissors (not pictured)
  5. Box cutter
Be sure to measure the area of the window that you wish to fill with the cardboard. Then measure again to make sure. Next, cut it out with the box cutter. Once you've reached that stage...


Yes, have your dog lay on everything before you cut out the fabric. Once she moves and you're able to cut the fabric to fit the cardboard (with a little overlap so the fabric doesn't uncurl), use the fabric glue to glue the fabric to the cardboard. I assume you could use other glue as well, but this is the one that I used.
And…wa-lah! Fabric privacy window! Push that baby into your window and you're good to go!

What projects have you been up to this week?

diy pallet sign

No Comments »


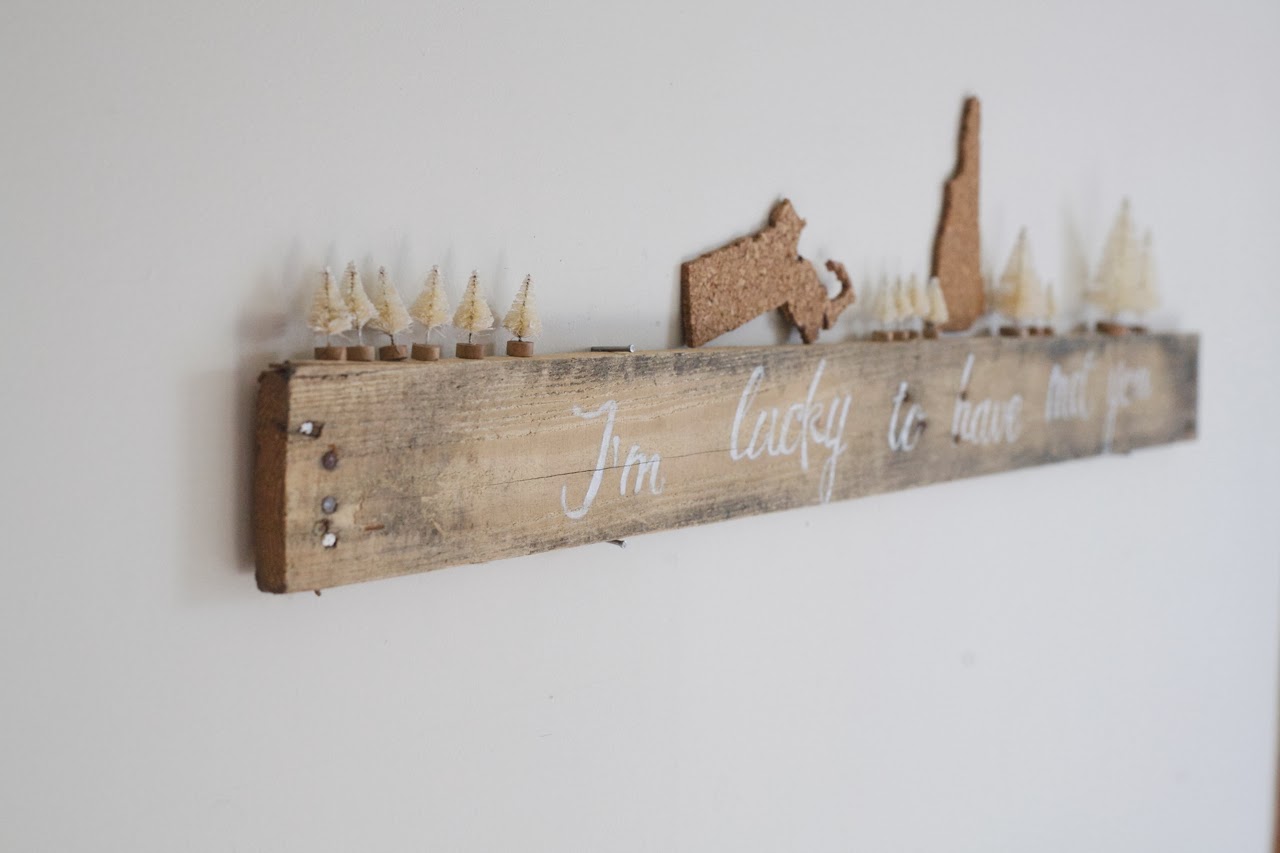
I had this idea that was swirling around in my brain for a while. I was not quite sure how to do it or where to begin. Then I saw these lovely signs on Instagram that Rebecca Caridad made on Manzanita and I was floored. How perfect are they?? 

As they were selling for $100 at the time (now that she's opened her paperie shop, they're $120), I thought there was no way to afford them and thought I would make a more imperfect version DIY my own. There was just one problem…I didn't know how to do calligraphy! Then along came this other DIY that I came across on Pinterest. Bingo! Follow the link to read how to make your own beautiful sign by Tammy at Homespun Happenings.

My sign idea came from lyrics of what we consider "our" song…Nirvana's "Drain You". The states of MA and NH are made of cork board; you could buy them from my shop here. For winter, I topped the sign with white bottle brush trees, available at Michael's.

P.S. If I ever have the money, I will totally have Rebecca make me some wedding signs. They are gorgeous!! Also, please note that I was not compensated in any way for this post. I just loved this DIY and wanted to share my results.

post swap: make a scarf!

No Comments »


Today I wrote a DIY for this lovely scarf at Yonder! Julie and I have collaborated together to show you all a couple of DIY Christmas gift ideas. Check it out here.


DIY post swap: knitted pillow

No Comments »

I am so happy to collaborate with Julie from Restless Hearts Yonder on a couple DIY posts. Julie and I have admired each other's crafts from time to time. I remember being especially blown away by them last year as she made Christmas gifts for people. She admired mine too and this year we decided that we would collaborate on DIY gifts. I wrote a DIY on her blog for a hand-stamped scarf and she wrote one for a knitted pillow (below). Keep reading to learn how to make your own knitted pillow. 


So one of the things I know a lot of us do around the holidays is look for inspiration.  I will spend a considerable amount of time on pinterest throughout the year, looking for "diy" project ideas.  This year, I've take some of those ideas and turned them into actual projects that I will be giving as gifts.  It's saving me money and getting me to be creative at the same time.  This project was inspired by a lot of the knitted pillow covers I've seen out there.  I knew I could make one for myself, because essentially all this is is a scarf folded over and sewn up the sides.  I bought a nice chunky yarn in an oatmeal color and really love how this turned out.  Give it a shot...I know you'll love this too!

There are two parts to this project: knitting and sewing.  For the knitting portion, you can use whatever pattern you like...I, for one, am not a super experienced knitter so the ribs were complex enough for me.  If you look closely, you will see that I messed up more than one time (talking and knitting at the same time!) but it's not noticeable enough for me to want to rip it all out and start over!  You can use all purl stitches, you can use all knit stitches.  If you know how to cable stitch, be my guest (I have not mastered that one yet).  My thinking was that I wanted this pillow to be simple, but I wanted the texture to have some visual interest (hence the ribs).  The sky is the limit, think of whatever you'd like!  You could also do a pattern including other colors or a design of your own!

Here's what you'll need:
-knitting needles (I used a size 10, but probably could have used bigger ones)
-yarn of your choice (I used this kind)
-cotton fabric big enough to make a pillow insert out of 
-polyfill or your choice of pillow filling
-a sewing machine or needle and thread
--a tapestry or plastic yarn needle with a large eye

For the knitting:
Cast on 40 stitches and straight stitch one row.  From then on this will be your pattern: knit 5 stitches, purl 5 stitches.  This will create the ribbing pattern.  Stitch this for as long as you'd like (I had a specific size pillow in mind when I started), just remember that your piece will be folded over length wise to create the pillow cover so make it pretty long.  In the end, mine measured 29 inches long.


After you're done knitting you will cast off and end up with a scarf looking piece.  Set it aside and grab your fabric for the pillow insert.  I made a pillow insert because putting batting into something that was knitted sounded like a mess.  Take your knitted piece and stretch it as far across as it will stretch and measure it.  Then measure the length.  Take those measurements and make a square with your fabric, just as you would for a pillow.  Sew around all the sides leaving a small hole to fill it with batting.  


After you've filled your pillow, sew it shut.  Then take your knitted piece and pin up one side.  Put the pillow into the knitted piece--it's going to be really fluffy and might seem like your knitted piece won't be able to fit around it, but it will!  Pin the pillow around all sides so that the pillow fits inside.


Thread a large eyed needle with a long piece of yarn.  You're going to sew up the sides with a simple running stitch.  Leave a tail at the end of your first stitch and tuck it underneath your stitches.  Do this around the edge of your pillow.  I found it easiest to do this while standing so that I could get the proper amount of tautness around the edge.  Make sure that if you do the ribbing, your ribs match up when you're doing this--it's just like matching stripes or plaids!  


When you're done just tie a simple knot and tuck the rest of the yarn inside the pillow.  There you have it!!


I hope you enjoy making a pillow for someone this holiday season!  I'm still debating whether or not I should give this as a gift or keep it for myself!!  Happy crafting!! 


find me here, here and here 

DIY washi tape outlet

No Comments »

I don't have the best looking photos to share for this DIY, but I am too excited about it to snap some new ones right now. This is one of the easiest and the happiest of happiness-bringing (if that's a word) DIYs that I have done in a while and I wanted to share it with you all.
 Before, this is what the outlet looked like. If you're a renter like me, you're stuck with a lot of these off-white or funny colored outlets. I was so tempted to replace them with white ones but I had two thoughts about that: 1. why should I pay the money if I'm just a renter and 2. the outlets themselves will still be that off-white color and I'm not sure my landlord would appreciate me painting them. However, I did not want to live with what I had, so what did I decide to do? Dress them up with washi tape, of course! If you're like me, you have rolls and rolls of this stuff hanging around, begging to be used.
 The supplies you need will include the wash tape of your choice (completely up to you what kind and how much you will use of each. This is what I had narrowed it down to.) and a flat-head screwdriver. Oh, and your faceplate too. Oh, and an exacto knife. I'll get better at this DIY thing…promise.
 Once you unscrew the plate off the wall, you can start placing the tape. I started at the top and worked my way down. I liked having one different colored/patterned piece to start off and the rest was uniform. You can cut off the ends of the washi tape that are too long and/or you can tuck them around the back of the plate. Then with an exacto-knife, cut out the holes for the outlets and the screw hole.
 Last, but not least, screw the faceplate work of art back over the outlets. Isn't that so much better? I look forward to working on the rest of the apartment now. (And when you're ready to move, you can simply unscrew the faceplate, peel off all the wash tape and screw the faceplate back on. So simple!)
If you try this DIY, let me know how it turned out!

diy tissue covered tea light

No Comments »

I was inspired by this pin that I found on Pinterest a while back. I didn't have a large vase to try this with, but I thought a tea light size candle holder would work just as well. I also had a smaller circle punch for the tissue pieces.

supplies: tealight vase, sponge brush
supplies: paper punch, tissue paper, mod podge, scissors
optional supplies: chocolate chips and cheap beer
cut circles in half to start at the bottom of the glass. mod podge circles onto glass.
finished product that night
finished product in the morning (better light!)
To find more detailed instructions, please visit the original DIY via this pin or visit Rhiannon's blog at Heygorg.com.


ornament inspiration

1 Comment »

I wanted to share with all of you some ornament inspiration that I have come across while dreaming up this ornament exchange. Thank you, Pinterest, for making this so easy.

Source: purlbee.com via Emily on Pinterest
Source: elsiemarley.com via Emily on Pinterest
Source: curbly.com via Emily on Pinterest


So far I have made the himmeli ornaments shown in the second pin. It was harder than I originally thought but the more of them that I made, the easier it got. I also experimented with different lengths and widths as well.

I cannot wait to make the rest of these for my tree, or perhaps use one of the DIYs for my exchange. If you have not signed up for the ornament exchange yet, please do so here! We are happy to have ya!

adventures with natural dye

1 Comment »

After seeing many DIYs on natural dyeing on Pinterest and various blogs I follow, I came across Chelsey's post about natural dyes. For some reason, I decided at that point that I would try it. I don't know if it was because I already had all of the ingredients mentioned in the blog or it was the gorgeous lamp shade that she made. Either way, I decided to go for it. Although I'm not a big fan of ombre, I knew I could have fun with dyeing my fabric a solid color. The link to the instructions are here at Chelsey's blog the Paper Mama. Here is some photographic evidence of my adventures:

turmeric soup
the turmeric onesie
boiling the tea towel, pre-dye
tea towel, post-dye
I've been very impressed with the vibrant color that comes out of this dyeing process. Way to go, Mother Nature!

One of these days I will post "real" photos again, but I cannot promise when. I have been loving Instagram a whole lot lately.

diy pouf progress

No Comments »

It is my intention to post at a later date with step-by-step instructions on how to make your own adult poof. Tonight, I started making my own with fabric that my co-worker gave me. She had some fabric that she thought she would no longer use. This is one of the fabrics (the lens on Hipstamatic makes it look more yellow than it is). The other is another fun fabric that I may use on some pillows later down the line.

solution for black-marked walls

No Comments »

I feel like I have been totally thrown off this week. After my week off, catching up at work has taken me extra time. Even though that's been more stressful, I have feel accomplished as well. However, this means that I do not get as much done at home. This also means that I post less, unfortunately. Tonight is the first night that I have had a little extra time to get a post out. I hope to have more time this weekend.

When I started to feel better towards the end of my week off, I thought I would try a black mark removal on our white walls. We love our Tater Bear as much as she loves her Kong, but we do not love the black marks that her Kong leaves on our walls. Now, I found this idea through Pinterest, but I am not sure of the source anymore. Sorry folks! The pictures aren't so great either, but I will continue to post as I work on the walls.

before
before
after, still drying
I used toothpaste and a toothbrush with a little water. I filled a small tupperware with water and dipped the toothbrush and paste in it and just lightly scrubbed at the walls. My walls are painted with flat paint, which is the worst paint ever to have marks show up on because it's so difficult to remove them. I was impressed while I "brushed"the wall and the marks slowly faded. As you can see with the "after" picture, it's not perfect but it decreased the unsightliness considerably. Give it a shot if you're living in a rental palace like myself or have some flat painted walls of your own.

pincushion idea via pinterest

4 Comments »

We had a very busy weekend. I will be writing more posts about the main event this weekend. For now, one small thing that I made that I was very proud of was a pincushion. I had been using a prototype of a stuffed animal that didn't quite work out. I wanted something a little more sophisticated, yet easy to make. Sincerely, Kinsey had made a great one, but I had a hard time finding a tea cup that I liked well enough to make a pincushion out of. As soon as I saw the below pin, I knew that I had found a winner because I could use fabric that I already had.

Source: duitang.com via Emily on Pinterest

A while ago I had bought some hand-printed remnant fabric on Etsy from Maramiki. I loved it and had been toying with ideas of what to make (pillows, box bag, clutch, pencil bag, etc) ever since I purchased it. I decided that part of one of the prints I would use for the pincushion DIY above. Here is my result:

I love how it turned out! If I ever make another one, I will probably use a bigger canning jar/lid to accentuate the big poof on top.

Linked up to...
 It's OVerflowing the gilded hare

Recent Posts